Paul has been fighting Japanese whalers with other volunteers and the financial backing of the animal planet for which he does a show: Whale Wars. While they've had success fighting the whalers and making it less worthwhile and risky for them to do their so called "research job" (of killing countless whales), the fight is not over.
He also explained that the Japanese are in the business of killing species of tuna and other fish that they overfish and stash as gold reserves in deep freezers so that they can sell the last specimens at super high prices (some blue fin tunas have already gone on the japanese fish market for $250,000 a piece).
Japan has also gotten in trouble after the making of The Cove in Taiji where the local Japanese fisherman would just slaughter dolphins by the hundreds because they didn't want them to eat the remaining fish that they are trying to fish too: in other words they were slaughtering dolphins because they were competition. On top of that, they were also feeding some of those very mercury tainted dolphins to their own school children who were getting mercury poisoning as a result (and they were also selling tainted dolphin meat on markets pretending it was tuna).
Back to whales, he mentioned that whales have much larger brains and neocortexes than we do, and are likely more intelligent than us. From what I had learned earlier about their communication and behaviour on a kayaking and whale watch tour, Orcas were not only highly social, but each pod had their own language, and also a separate language to communicate between different pods. From what I read, there is no conclusive evidence on direct correlation between brain size and raw intelligence, but most people seem to agree that the few mammals with bigger brains than humans are pretty intelligent. Obviously, there is a moral issue with killing mammals that are from fairly to highly intelligent, even if you're not vegan.
Separately, he talked about big oil companies getting away with major spills due to the money trail ending at governments. As a result, he gave examples of them being accomplices and muffling big investigations by the EPA or other organizations where people got away with fines as opposed to jail time for extreme negligence. He did mention, and he is right, that a set of big corporations is definitely more interested in short term profits than big the big picture, be it for oil or overfishing. After all, all they care about is the next quarter's stock price, or making a good profit at the next fish market sale.
To be honest, I don't know the greenpeace folks much, but I always had an opinion of them that some were kind of non very reasonable fanatics. After having listened to Paul's 45mn presentation, I found him to be a quite reasonable guy and found him pretty convincing: most people would have issue killing and eating their cats and dogs, and they should feel the same about at least very intelligent dolphins or even more intelligent whales.
For the record, Paul doesn't think very highly of greenpeace which he left many years ago and is more into fighting any whaling in whichever ways that are still legal.
In the meantime, the more they can stop things like those, or the Danish killing dozens to hundreds of whales every year, "for fun", the better.
good old thunderhill, I'll be back soon :)
argh, all this for junkmail I never asked for :(
viewing platform for Mt St Helens
Museum of Aviation visible on the left of the runway
I had no idea the concorde had an anti tailstrike tailwheel
Their warbird collection was quite good and well layed out
the drone was supposed to launch with nukes in unfriendly territory
the smith tower is a nice view open later than the BOA tower and better view than the space needle
a seaplane was doing patterns with passengers on the nearby lake
cool shadow of our plane in the clouds with a rainbow around it. Neat!
little island just next to Lopez Island, pretty cool.
they have a catalog of local orcas
we saw a few orcas after a long boat trip
Before leaving friday harbour, we biked around the island a bit:
making sure my blood O2 saturation was still good at altitude
As predicted by my skypad with XM weather, weather got a worse as we were about to enter California and got closer to Mt Shasta. We had to make a sharp westbound turn and fly around it to stay VFR on top (I had no interest in getting under the cloud layer and being sandwiched between it, and the rising terrain, or ending up in a box canyon).
while in our way, the cloud made a nice wave, like surfing inside a crashing wave (this was just as we turned west)
we then got some nice VFR on top all the way back
and by Oakland, we got under the forming overcast that was starting to cover the bay (incidently, not Palo Alto yet)
So, what was the bill? Indeed, it was over $93,000 for just the hospital (my surgeon bills separately, and I may also get a separate anesthesiologist bill and potential lab fees).
While I realize that world class surgeons should get paid for their skill, and hospitals don't run just on good wishes and fresh water, they still cost over 5 times what I'd pay in France for similar service (minus maybe things that would be considered unnecessary).
Now the "fun" part is where the insurance has pre negotiated prices and decides that things are really worth less than what the bill says. From there it goes from $93k to $16k!
Now, $16k is not cheap, but feels not as unreasonable as the first bill. What's disheartening though is that it's likely people without insurance who get billed full price and maybe get a measly 25% discount in the end.
I don't work in a hospital, but I really do wonder how they get to quote such outlandish prices and what happens to people who don't have insurance that will refuse to pay their rate and negotiates the prices way down.
Oh, if you add "supplies", it adds up to $26k billed. I really want to see what supplies I got for $26K worth.
Even over $1650's worth of drugs is steep, but of course that starts with drug companies charging pretty ridiculous prices (which Cigna mostly fully paid).
Anyway, there is a lot of things to fix in the medical industry, but I suppose that's no news to everyone :-(
In the meantime, I can thank Cigna PPO for making this experience mostly a non event financially for me.
I wanted to have a USB key that could boot both UCBD and UBCD4Win, the two award winning ultimate boot CDs for rescue and other things. Turns out however that making a bootable USB key is not that simple, XP is not even meant to boot from USB apparently.
To make things simple, UBCD boots with syslinux and UBCD4WIN boots with grub. However, copying the files from UBCD4WIN on a UBCD bootable USB stick does not allow to boot XP from grub anymore (it complains about a missing boot.ini it didn't need before).
After some research and work, here's what I was able to find and come up with. I'd love to be able to just share my image with you, but because of the XP license and requirement that you use your own XP media to generate it, I can't do that unfortunately.
color black/cyan yellow/cyan default /default default 0 timeout 10title Launch "The Ultimate Boot CD for Windows" fallback 1 find --set-root /ntldr chainloader /ntldr savedefault --wait=2
title pause
# doesn't work without patched grub #title UBCD menu #chainloader /boot/isolinux/isolinux.bin #savedefault --wait=2
title BIOS configfile /ubcd/menus/grub4dos/bios.lst
title CPU configfile /ubcd/menus/grub4dos/cpu.lst
title HDD configfile /ubcd/menus/grub4dos/hdd.lst
title Memory configfile /ubcd/menus/grub4dos/memory.lst
title Others configfile /ubcd/menus/grub4dos/others.lst
title Peripherals configfile /ubcd/menus/grub4dos/periph.lst
title System configfile /ubcd/menus/grub4dos/system.lst
title Parted Magic V4.10\n Linux distro for manipulating partitions (eg. create, resize). Includes\n TestDisk, PhotoRec, Partition Image...) configfile /pmagic/boot/grub4dos/grub4dos.lst
title UBCD FreeDOS R1.38 (Based on NwDsk V3.40)\n FreeDOS boot disk used to run many of the other DOS apps on the UBCD. map --mem /ubcd/images/fdubcd.img.gz (fd0) map --hook chainloader (fd0)+1 rootnoverify (fd0)
title User-defined configfile /ubcd/custom/custom.lst
title pause
title Reboot\n Reboot the PC. reboot
title pause
title commandline savedefault --wait=2 commandline
title floppy (fd0) chainloader (fd0)+1 rootnoverify (fd0) savedefault --wait=2
title reboot savedefault --wait=2 reboot
title Darik's Boot And Nuke v2.0 ~ Submenu configfile /dban-Grub4dos.ini
title FreeDos map --mem (hd0,0)//Images/freedos.img (fd0) map --hook chainloader (fd0)+1 rootnoverify (fd0)
title GOBACK Removal Tool map --mem (hd0,0)//Images/goback.ima (fd0) map --hook chainloader (fd0)+1 rootnoverify (fd0)
title Memtest86 v3.5 (iso boot) map (hd0,0)//Images/memtest.iso (hd32) map --hook chainloader (hd32) boot
title NTFS-Dos map --mem (hd0,0)//Images/ntfs4dos.img (fd0) map --hook chainloader (fd0)+1 rootnoverify (fd0)
title Launch "Windows(tm) Recovery Console" fallback 1 find --set-root /cmdcons/setupldr.bin chainloader /cmdcons/setupldr.bin ##################################################################### # write string "cmdcons" to memory 0000:7C03 in 2 steps: ##################################################################### # step 1. Write 4 chars "cmdc" at 0000:7C03 write 0x7C03 0x63646D63 # step 2. Write 3 chars "ons" and an ending null at 0000:7C07 write 0x7C07 0x00736E6F savedefault --wait=2
Other random links I found:
All that is left is to move the teeth back to a location that makes sense for my new bite. Unfortunately that will likely take a year or so, but oh well...
Ah, yes, my sleep. It's definitely better than before, no question about that, although it'll likely take another month or two before I get official scores from a sleep study.
While I was not in a huge hurry myself, I figured why not? so there we went after a reasonably short flight directly to fullertown airport just 10mn from Disney (closer than LAX and all that crap).
Anyway, here are the picts:
moderately happy with the ride :)
Random pictures:
The Jedi Training Show was actually fairly good:
But Asimo in futureland was very cool, I had never seen it in person:
More random pictures:
Anyway, back to California Adventure:
The animated rotated animation lit by strobe was really cool (looks better in real life than my camera video where it flashes a lot, but it gives you an idea):
We also got a cartoon drawing class:
ok, I won't quit my day job :)
Some rides are really good decors, I was impressed:
They also had a really well made Simbad Musical:
More random pictures:
this was a fun elevator ride up and down
The new 4D shooting show was quite fun
This is the waterfront where the world of color show takes place, it's actually pretty nice:
And we finished the day with the California Adventure World of Color Show. It was actually quite pretty, and cool to display video on water:
It was a packed two days, but we pretty much got to see everything in both parks, which for my dad is actually a really good job :)
Good fun was had by all as they say.
all these years, my dad liked cats, he just didn't know :)
nice dinner before visiting Disneyland
Coming back from Disneyland, we landed at Harris Ranch for a good lunch:
more meat parts than I know about
We went to a wine tasting Jennifer was doing at Travieso
Other random picts:
My dad had always wanted to visit Alcatraz, so we finally got around to that. They do have a really good audio tour:
When then did a duck tour of SF, maybe not the best tour ever, but a fun enough way to spend the rest of the afternoon:
That evening, we then saw Beauty and the Beast, which was pretty good:
I went through my old pictures at VA Linux, and selected a few "best of" category.
It's a good trip in memory lane if you'd like to indulge :)
Beer Bashes:
Funny thing, I still have those two weapons in my cube:
Eh, we actually built and shipped stuff:
Oh yeah, that:
classic T-shirt:
Chris was always meant to be a penguin :)
Walt:
We're not alcoholics :)
IPO:
Can't argue with the logic:
Don Dugger, classic:
San, my man:
Getting hardware from the trash:
Allhands:
Funny slide:
new buildings:
who's the ice cream man?
Xmas:
Jeremy, you make me horny:
Steve, the master cook:
Chris Antilla/and Theresa Marie, Chili Judges:
For those who were there, our scooter and chair race around the track:
(I won the chair race by the way :) )
And in no time, Engineering was let go, Walt doing BBQ for us:
Josh, and his many hawaiin shirts:
We didn't quite come close:
Morale was high:
VA hemoraging staff:
Aaah, Leanne :)
You look good Steve:
Oh man, Brian was stoned big time
Oh, well, maybe it wasn't just him:
Hair to impress:
Jeremy, I think of you at night still, and I wish I didn't :)
Ah, our new CFO, she was cool, I liked her. Too bad she picked the wrong
company:
Yes, TM, you look good too :)
Classic Linuxworld:
And that's all folks, fun memories, good times :)
The one issue with the Cularis is that it has no landing gear, when putting the camera under the plane, that's the first thing to hit the ground on landing, which ain't ideal (I saw someone who put the camera under one wing and used a counterweight, but the view isn't as good.
I ended up putting the camera under the plane with some foam to protect it and planned to land in the weeds. For my 2 flights, that worked fine although it wouldn't work as well if I had to land in a parking lot :)
My first flight (video below) was 16mn and went fine. The second flight lasted a whole 25mn, although that was pushing it, the battery died just as I was landing (i.e. I got lucky :) ).
I took some 3Mpix shots from the video, a few are below:
another nice view of the cemetary
they have a nice array of solar panels
why do people fill their garages with junk and park outside?
Here is the video of the first flight:
Until recently, I had a Brand One Powermeter to measure PG&E Meter, PV system and my AC. It was bulky, unreliable, and impossible to reprogram. In other words, it was a poor and expensive solution. That said, I still got some data and reasonable graphs from it as per this earlier blog post.
But let's be honest, I really didn't like that monitor and wanted to ditch it. After some research, the ECM1240 is the best feature/cost ratio power monitoring device I found (as of 2010). As of 2019, the ECM1240 is now obsolete and replaced by the Greeneye, see below:
_Note, there seems to be a better monitor now, the Greeneye._ You may want to have a look at Brultech Greeneye.
Why is it better than the alternatives?
Here's what it looks like:
I calibrated the TTs vs the split 60CTs and the small CT-40s by comparing measurements of the same load
the 2 white boxes are the ECMs1240s, but I also have my older and bigger brand one power meters in there
the small donut CT-40s are great, they take no room at all
After getting this installed, I was able to get data on linux after I got a working but incomplete (for me) ecmread.py from prior authors, Brian Jackson, Kelvin Kakugawa, and Amit Snyderman. I modified it to support net metering and show high precision data as required by proper per second graphing in cacti.
Ok, first you can find all the graphs here: all regular owfs derived graphs.
And here are the interesting composite graphs.
So, US houses come with 2 120V phases. Now, if you wanted 100% exact wattage measurements, you'd have to measure the voltage on each and every circuit breaker you measure, but in reality measuring each phase is close enough.
In real life, measuring amps on one phase with voltage from another phase will only give you about a 1-2% error at worst, so it's not a lot to agonize about. In my setup I tried to measure phase 2 loads on my ECM that's plugged into phase 2 power, but wasn't fully able to do it, and it's not meaningful when you measure 240V loads anyway.
This is what the phases look like, as the graph shows phase 1 typically gets more power than phase 2 for me, but depending on the load in my street and my house, they sometimes become close or equal:
Of course, I have a lot of single interesting graphs. Can you tell when my disk to disk backup completed? :)
More importantly, and worryingly, compiling the same kernel took 30mn and 20W on my dual core duo laptop:
While compiling the same kernel on my dual Xeon P4 server took 2H and 80W-ish:
Another interesting graph was charging a 12V marine battery for my UPS:
Thanks to this graph, I was able to find that my TV and speakers took 30W when off. I got a smart power strip that turns them off totally and saved about 30W off my base load:
Ever wonder how much power your fridge is really using?
So, how much power does AC use? Well, not only 3500W for AC, but another 1000W for the whole house fans:
A cool graph showing House Power Use (calculated) from PG&E meter and PV production probe:
And for the money shot, all the house uses combined on one graph:
And the same graph, but with AC that was activated:
See my cacti config page.
Now, the tricky part is creating graph items that do not exist (like house use, or unmonitored house use). See this post I made on how to do this.
The other tricky part is that I had my ECM graphs setup to refresh every 10 seconds, which is faster than the cacti poller which runs every minute. This post explains how I did a faster than 1mn refresh in cacti
While the conference is still young, they did a good job and attendance was good.
my source control system was _this_ big :)
software patents are both interesting and depressing
the questions on geeks vs nerds were a bit disappointing though
It was cool to have run into Maddog again. It had been 14 years since we first met.
that was the linux pavillion at Comdex in 1996
They also had a nice butterfly exhibit:
I snapped a few nice shots from the plane:
I then had a weekend in Boston before the conference. Below are a few random pictures from Boston.
ok, they have somewhat historical buildings :)
french dinner for our anniversary
no, I don't have a DSLR or even a tripod :)
The Aquarium wasn't fantastic, but it wasn't bad. Their big tank that you can walk around and see from different 'depths', including the top where they have some giant turtles, is pretty cool.
The science museum, however, was really cool. They have the bigger Van Der Graph belt driving generator in the world, which is understable considering it was built by its inventor at MIT which then donated it to the museum.
They also had a nice butterfly exhibit:
this is what they look like when they're very old
this one landed on my pants :)
Next, I got a nice tour of MIT, which was definitely interesting.
One fun thing MIT students do from time to time is a so called hack, doing something impressive and/or mind-boggling like putting a cop car on top of their main building
that was a few years ago, this is how cop cars looked back then
putting it on top of the dome must have been hard, it had to be helicoptered down
A few cool picture from the MIT museum where the same exact picture seen from close and far looks different (look at your laptop screen from a distance to see):
Harvard had a much nicer campus as seen from the outside though:
and yes, they have their own cop cars too
A few pictures from a cruise dinner:
I got lucky with this one considering it was handheld from a moving boat
All in all, it was a very nice city to visit during the summer.
In a prior post, I wrote about using digitemp to talk to 1-wire temp sensors.
Digitemp is a good first choice if you only care about temperature since it's already available in most linux distributions, and it's pretty easy to setup. However, digitemp is fairly limited: first it does not support anything but temperature, and one humidity sensor (with only one convertion table, and there are several depending on which one you end up buying). On top of that, the humidity sensor only works with the serial interface and not the USB one.
1-wire supports a lot more than just temperature, including several kinds of humidity sensors, a moisture sensor which can be used to measure the amount of watering needed for your lawn, and outdoors UV and solar intensity sensors (available from hobby boards).
1-wire also has weather stations, but you do have to worry about your pole with the wind sensor being hit by lightening that would then be channeled back inside your house and to your computer (not good). Also, I have not found 1-wire weather stations to be price competitive with an Oregon Scientific WMR968 which is wireless and can be directly connected and read from via its serial port on linux and through misterhouse.
http://www.hobby-boards.com/catalog/index.php?cPath=22
This gives you a total of $493. For comparison an oregon scientific WMR968 weather station costs $200 (see this thread for details on that) and my WMR 968/rfxcom page for my setup.
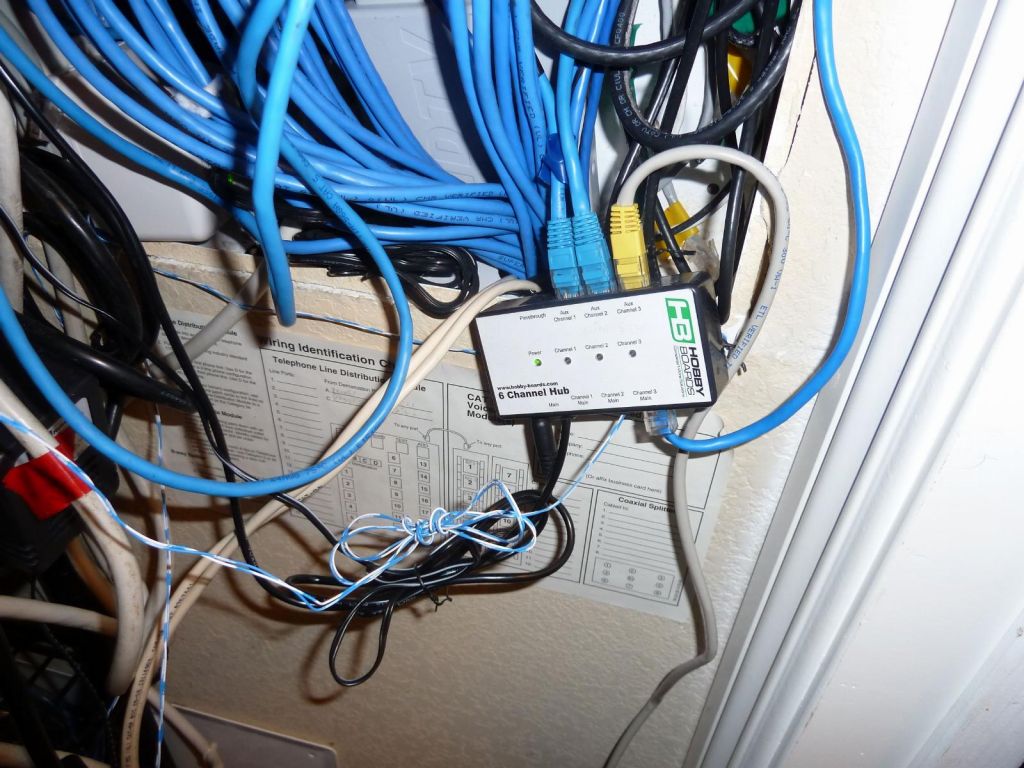
After switching from digitemp, I realized that my single bus described here was really stretching the limits of a single bus. I therefore ended up adding a hub.
What you need to know about the hub is that you get 6 buses split off your original bus (i.e. you get 7, one is the original bus passed through but with bus power added, and there are 3 1-wire switch chips with a MAIN and AUX sub bus each, effectively giving you 6 more busses). The Hobby-Boards 1-wire hub, which is the one I bought, injects regulated 5V power and unregulated 12-24V power for some special outdoors 1-wire devices on all the ports, including the pass-through one.
Having a powered bus with 5 and 12-24V allows the use of some special 1-wire devices like the moisture meter, and the UV sensor.
If you go with the hobby-boards hub, you should plan to wire like they do to make your life easier: hobby boards wiring chart.
.
I talked about what to buy, and how to wire on my last Temperature monitoring and graphing with 1wire devices, digitemp, misterhouse, and cacti post. Go read that section.
If you have a wiring closet where all your cables come back, you have a star topology. With a hub, you can have up to 7 branches, which may be enough for you. If however you need more than that, when you use the wiring chart from hobby-boards, I recommend that you use pair 3-6 as a return for pair 4-5: i.e. you send signal down your cat-5 to some location and then you connect 4 to 3 and 5 to 6 at the end point. You then connect 3 and 6 to 4 and 5 of your next Cat-5 run elsewhere in your house.
When combining this techique and the 7 branches you get from a hub, this should give you more than plenty branches from your network closet.
I added the Hobby-Boards UV sensor to my roof 1-wire bus now that it had bus power added to it after I got the hub, and I used cella-wrap to make sure water wouldn't get in the box or touch the 1-wire device wires and create a temporary bus short. The UV board also has a built in temp sensor, but the weatherproof box it comes with will act as a greenhouse somewhat, so the temperature read by that sensor will be higher than normal (it is used for UV readout temp correction). If you don't care about UV index as much and would like outside humidity level, you may want to consider the humidity/temp/solar sensor instead (I get outside humidity through my WMR968 Oregon Scientific Weather Station, so I didn't care to have that in my outside 1-wire sensor).
UV sensor in mostly water proof box
gets inside the attic through a water proof hole
The moisture meter has a temp sensor on the moisture meter control board, but it is unfortunately not used to correct the moisture readings from the moisture probe (this sensor does have a moisture value that can vary up to 50% when fully wet between temperature extremes). Thankfully in real life, your soil temperature deeper down should not change too much and affect the reading too much.
I then buried the control board too so that it could be used as a soil temperature sensor.
the trick was not to bury the sensor too deep: just as deep as my grass roots
protecting the board from water
regular DS18B20 outside temperature probe in the shade
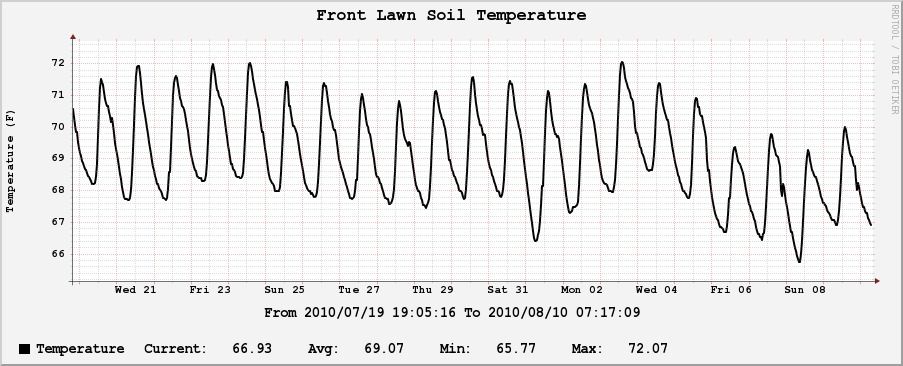
The temperature graph is not super exciting, but still good info. It's reassuring that the dirt temp doesn't change much and therefore the moisture readings won't be foiled much:
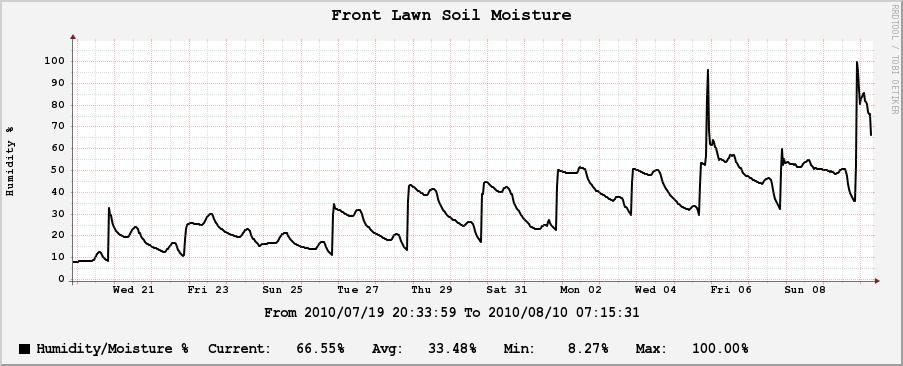
The moisture readings are more useful and for instance this graph shows how I wasn't watering enough, and turned up the sprinkler times a little bit so that the humidity ends up at a reasonable state:
But the really interesting graph is seeing soil humidity over soil temperature (green) and outside temperature (red):
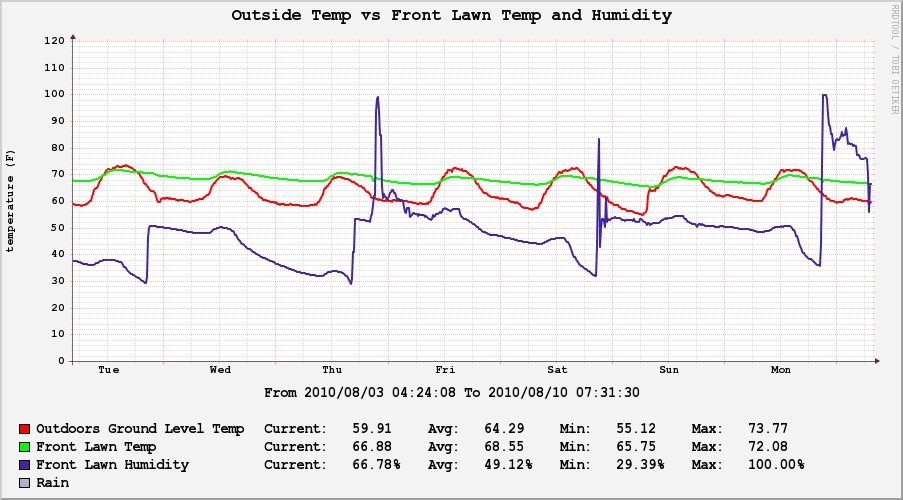
what this graph shows is outside temperature obviously affecting soil temperature a little bit, and when soil temperature goes up on a wet sensor, it brings up the moisture reading somewhat unfortunately.I looked at the range of values I typically get for full dry and full wet, and this is definitely sensor and board dependent. There is also the problem that the hobby-board design up to 2010/05, did not have a ground loop isolation transformer (without which the sensor would behave erratically as soon as you put it in the ground). Once you add the isolation tranformer, it does change the current values for dry and wet though, so each person may have to compute their own. Unfortunately I've seen my sensor briefly return values all the way to -2.55 instead of the typical wet -1.74cat /etc/owfs/moisture/35\ Front_Lawn/current; echo -1.35875
This is the code I use for now:
# 0.56625/0.5675 bone dry, but once got 0.335625. # glass of water yielded 1.74 but I've sometimes seen 2.555. What to use? my ($min, $max) = (0.33, 2.6);# value should be temp ajusted in an ideal world, but I don't have correction tables. $value *= -1; $value = $min if ($value < $min); $value = $max if ($value > $max); $value = (100 * ($value - $min) / ($max - $min));
I've struggled on finding the upper value. First, I got -1.74 but eventually I sometimes got -2.55 out of the blue for a few samples, which yielded some clipping, so I changed the max value from -1.74 to -2.6 at noon on this graph, explaining the sudden dip. You can however you can see on the left the jump to 100% when the sprinklers were started:
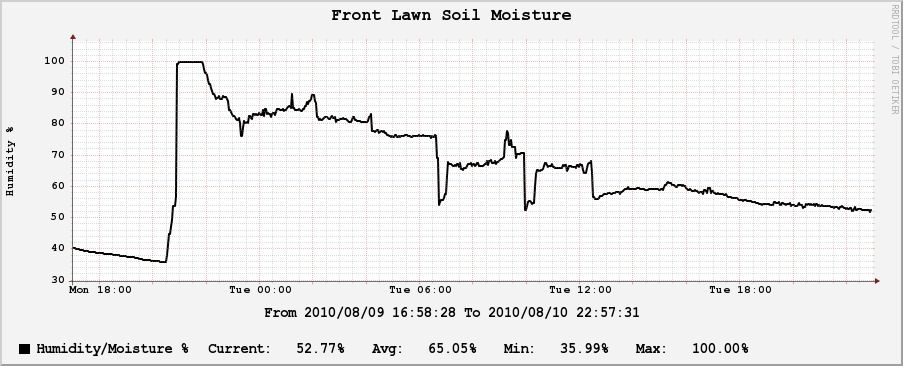
Despite the sensor being noisy, temperature dependent, and hard to calibrate, the overall graph is still useful enough to show whether your sprinklers are keeping the dirt moist enough, or if your overall moist is just going down (bad).
But back to 1-wire and owfs, owfs is more work to setup but it's just the way to go if you want anything more than temperature monitoring.
You need to start by getting the latest source code from http://www.owfs.org/, and compiling it. /configure --enable-debian
did the right thing for me, but you need to make sure you have the right headers on your system
I wrote this script, read_owfs that reads from an owfs symlink tree and generates a digitemp looking logfile so that it's easy to parse the logfile later with the same code regardless of whether you use digitemp or owfs to capture the data.
owfs with a hub is a bit "interesting" since you have to find your devices in subtrees, which is why I made a symlink tree to make my life easier. I setup a symlink for each hub port and a chain name to point to each of the 3 buses' AUX or MAIN branch. This is what it looks like:
/etc/owfs/bus1 -> /owfs/1F.F05005000000 /etc/owfs/bus2 -> /owfs/1F.E25005000000 /etc/owfs/bus3 -> /owfs/1F.E15005000000 /etc/owfs/chain1 -> bus2/main /etc/owfs/crawlspace_chain -> bus2/aux /etc/owfs/dining_chain -> bus3/main /etc/owfs/roof_chain -> bus1/aux/etc/owfs/humidity/56 Hall_Closet -> ../chain1/26.2E4DF5000000/HIH4000 /etc/owfs/moisture/35 Front_Lawn -> ../crawlspace_chain/30.131A62120000
/etc/owfs/temperature/11 Family_Room -> ../chain1/10.A8D1ED010800 /etc/owfs/temperature/12 Living_Room -> ../chain1/10.52D1ED010800 /etc/owfs/temperature/15 Garage -> ../chain1/10.2223EF010800 /etc/owfs/temperature/21 Attic -> ../roof_chain/10.5DE1ED010800 /etc/owfs/temperature/22 Roof -> ../roof_chain/10.94A2ED010800 /etc/owfs/temperature/23 Outdoors_Roof -> ../roof_chain/28.57B659020000 /etc/owfs/temperature/25 Roof_UV -> ../roof_chain/EE.E749CB010800 /etc/owfs/temperature/31 Crawlspace -> ../crawlspace_chain/10.F9F3EE010800 /etc/owfs/temperature/32 Outdoors_Crawlspace -> ../crawlspace_chain/10.D1D0ED010800 /etc/owfs/temperature/35 Front_Lawn -> ../crawlspace_chain/30.131A62120000 (...)
This is how I start owfs and the xpl-owfs gateway:
gargamel:/etc/owfs# cat /etc/init.d/owfs #!/bin/sh case "$1" in start) umount /owfs 2>/dev/null # serial /opt/owfs/bin/owserver -d /dev/DS9097U -F --error_print 0 --error_level 1 --nozero # usb #/opt/owfs/bin/owserver -u -F --error_print 0 --error_level 1 --nozero /opt/owfs/bin/owfs -F -s localhost:4304 /owfs --nozero /opt/owfs/bin/owhttpd -F -s localhost:4304 -p 8082 --nozero # this comes from xpl-perl, reads /owfs devices and relays their data periodically # over XPL, where they can be relayed to misterhouse. xpl-owfs --interface eth1 --owfs-mount /owfs >/dev/null & ;; stop) pkill -f '/opt/owfs/bin/owfs' pkill -f '/opt/owfs/bin/owserver' pkill -f '/opt/owfs/bin/owhttp' pkill -f 'xpl-owfs' ;; restart|force-reload) $0 stop $0 start ;; *) echo "Usage: owfs {start|stop|restart|force-reload}" >&2 exit 1 ;; esac exit 0
owfs-xpl is a good way to relay 1-wire data to misterhouse via its XPL gateway as opposed to reading owfs directly since you're assured not to hang.
This is how you setup devices in misterhouse:
XPL_SENSOR, bnz-owfs.*:10.2223EF010800, garage_temp, , temp XPL_SENSOR, bnz-owfs.*:28.3359C7010000, freezer_temp, , temp XPL_SENSOR, bnz-owfs.*:28.998D4D020000, computer_closet_temp, , temp XPL_SENSOR, bnz-owfs.*:26.2E4DF5000000, hall_closet_temp, , temp XPL_SENSOR, bnz-owfs.*:26.2E4DF5000000.1, hall_closet_humidity, , humidity
If you use xpl-owfs, adding .1 behind a humidity value lets it pick another DA converter between the default one in owfs: .1 for HIH4000, and .2 for HTM1735 (it makes a difference since the analog value is turned into a different moisture percentage value as a result).
Here's what it looks like and the patch for xpl-owfs if you are not running a recent one with that support:
gargamel:~# grep . /owfs/26.2E4DF5000000/{.,*}/humidity /owfs/26.2E4DF5000000/./humidity: 58.8895 /owfs/26.2E4DF5000000/HIH4000/humidity: 60.5681 /owfs/26.2E4DF5000000/HTM1735/humidity: 56.8768--- /usr/share/perl5/xPL/Dock/Owfs.pm.orig 2010-04-17 09:08:43.000000000 -0700 +++ /usr/share/perl5/xPL/Dock/Owfs.pm 2010-04-17 09:25:25.000000000 -0700 @@ -154,6 +154,8 @@ foreach my $dev (@$devices) { foreach my $rec ([ "temperature", "temp" ], [ 'humidity', 'humidity' ], + [ 'HIH4000/humidity', 'humidity', 1 ], + [ 'HTM1735/humidity', 'humidity', 2 ], [ 'counters.A', 'count', 0 ], [ 'counters.B', 'count', 1 ], [ 'current', 'current' ]) {
Once you have misterhouse configured to receive XPL messages, with those in mh.private.ini:
ipaddress_xpl_broadcast = 192.168.205.255 ipaddress_xpl = 192.168.205.3 # this is how you turn it off #xpl_disable = 1 # if you are using a better XPL hub, turn off the mh built in one #xpl_nohub = 1
Then, you can simply read owfs values in misterhouse via XPL like so:
my $compcloset_temp = $computer_closet_temp->state()(there is one caveat there: misterhouse does not currently have a timer to remove the temperature value if you aren't getting updates from xpl/owfs)
Note that there are other ways to read owfs in misterhouse, namely:
The summary of the threads I posted however is that xPL and xpl-owfs are the way to go for reading owfs sensors in mh.
Now that you have data available in /etc/owfs/*, and being sent to misterhouse via xPL, you can (and should) log it to a file.
I have written two scripts for this:
/etc/owfs/
and populates a digitemp looking file in /var/log/temperatures./var/log/temperatures
file and converts it into rrdtool data or cacti compatible query data.The second script is the important one which can generate cacti data or help you regenerate/build an rrdtool RRA file from scratch if you add fields or change your data format (my recommendation is to plan ahead and add extra fields in your RRD file for probes you might add later (you can't add fields after the fact without regenerating the entire file and refilling it with all the data from time 0, so it's better to plan ahead and get it right the first time, and a good way to do that is to just add extra fields that you're not using yet but can use later) ).
For more details on cacti integration, see my Gatewaying 1-wire, XPL (Oregon Scientify Weather), Brultech ECM1240 Power Data, and Brand OneMeter Data to cacti page.
cacti_owfs can also be used for feeding data in an rrdtool after the fact (--dump-cacti) and used like so:
sort -u < dump | time xargs rrdtool update $RRD --template `cacti_owfs --cacti-dump-header`(after having freshly re-created the RRD and make sure you use
--start 1271572300
with the right second value that's just before the first one in your dump). See my cacti config page.
Ok, first you can find all the graphs here: all regular owfs derived graphs.
And here are the interesting composite graphs.
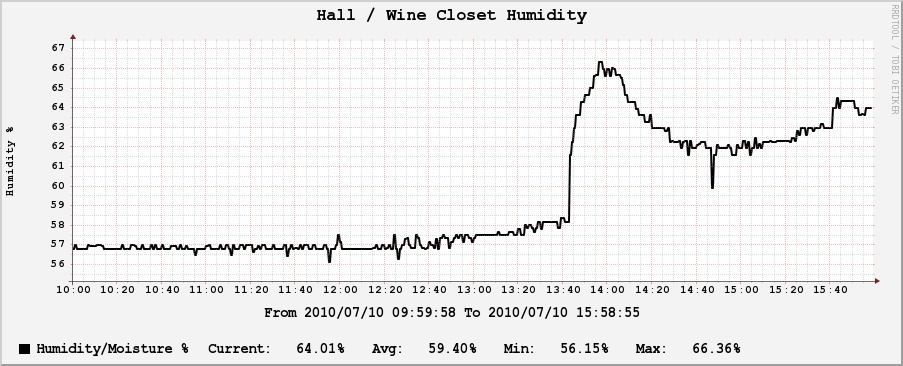
I keep track of the humidity in our wine closet. This chart shows when I refilled the evaporation water plate:
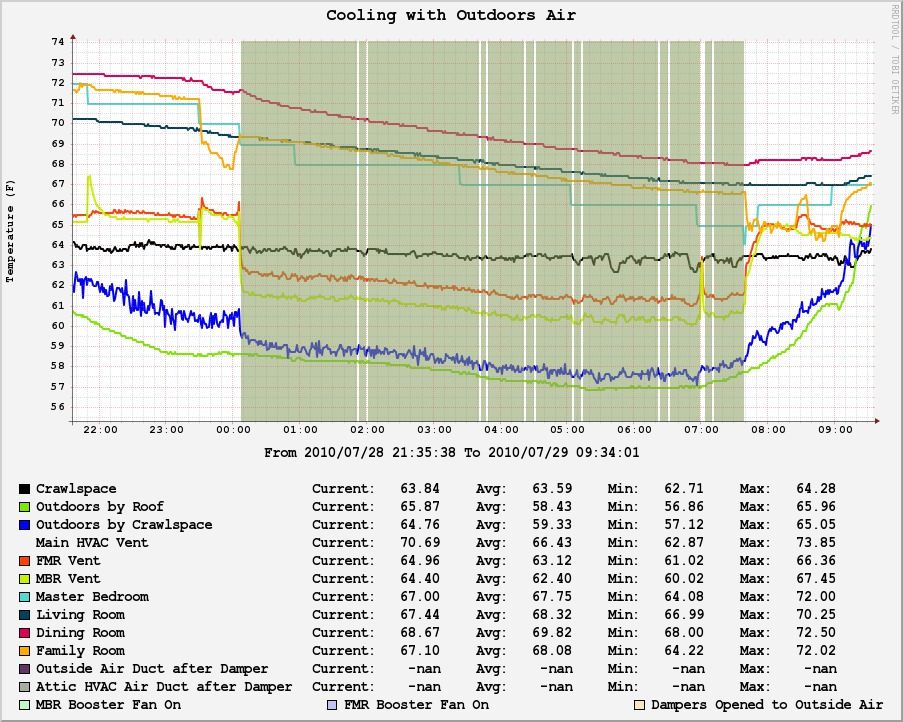
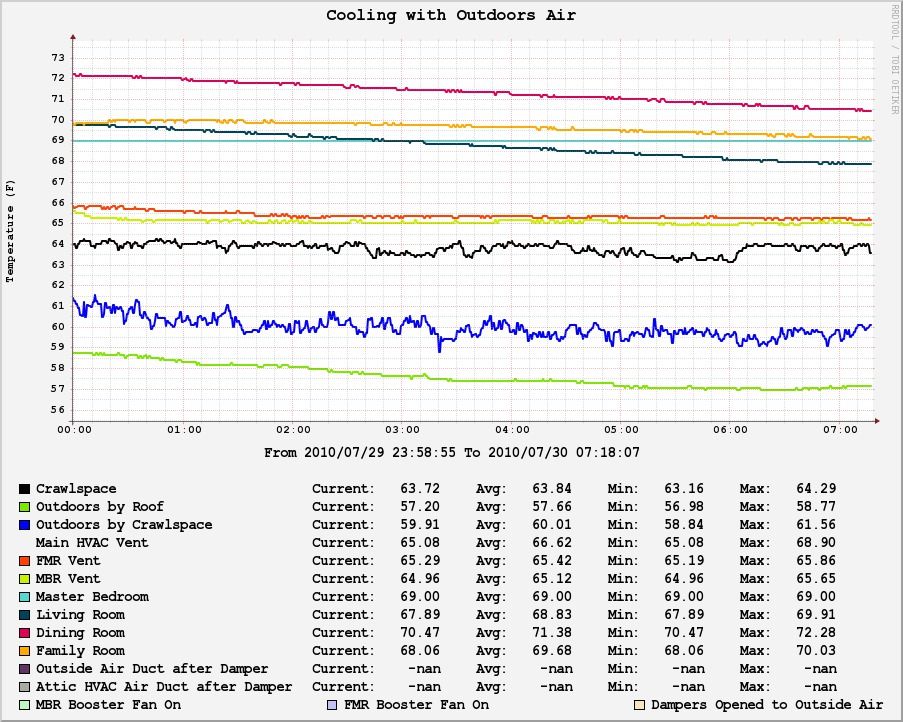
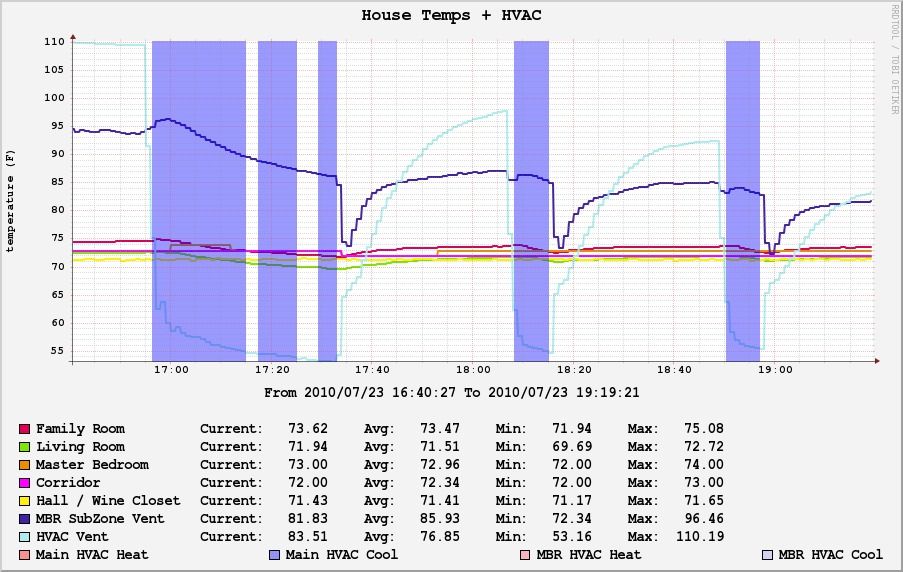
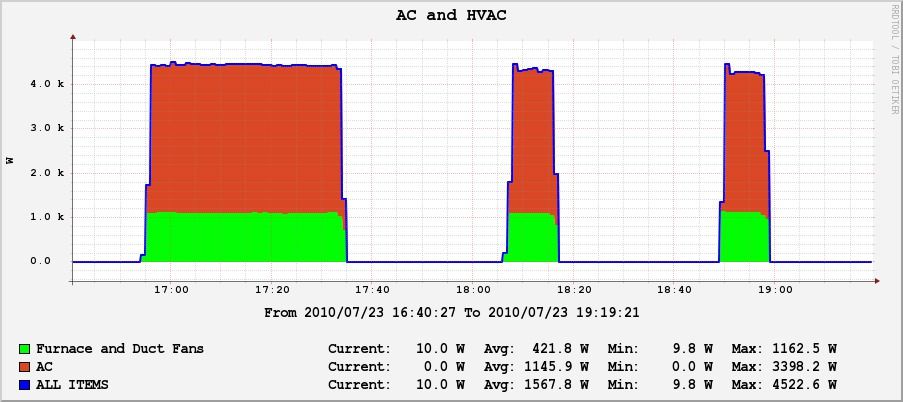
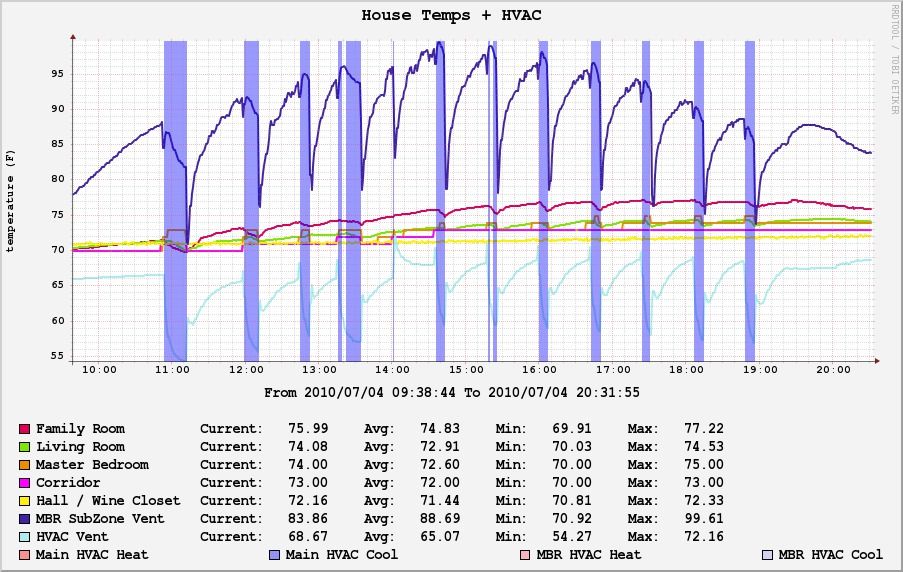
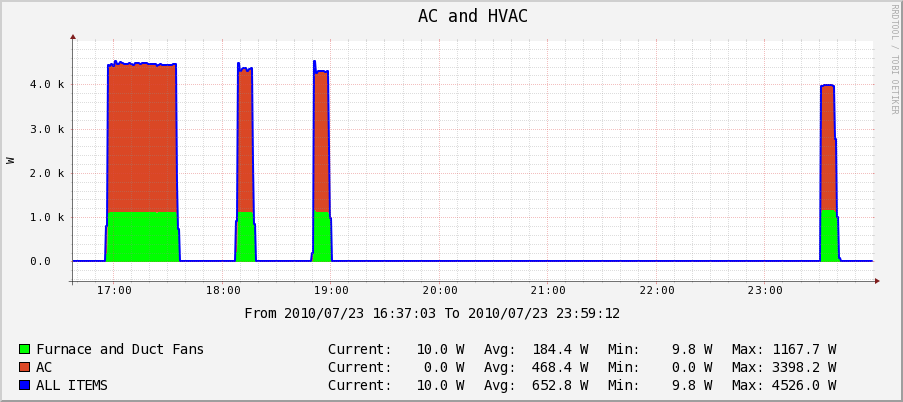
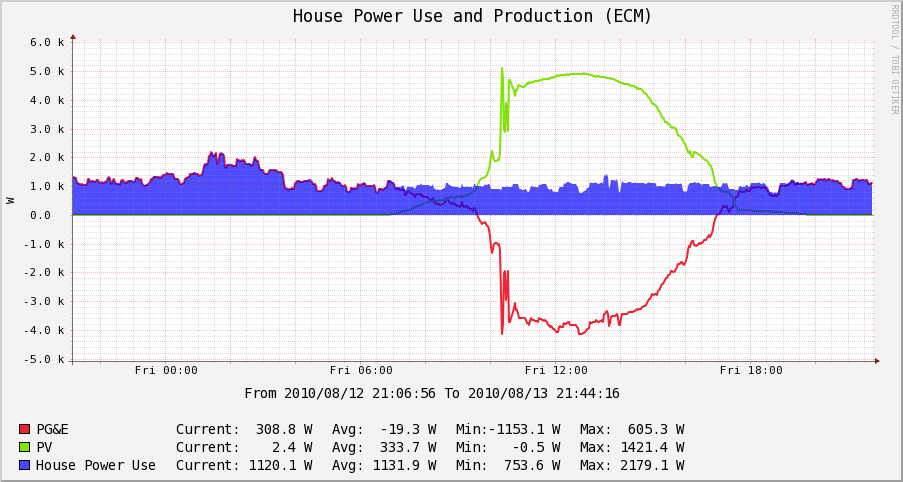
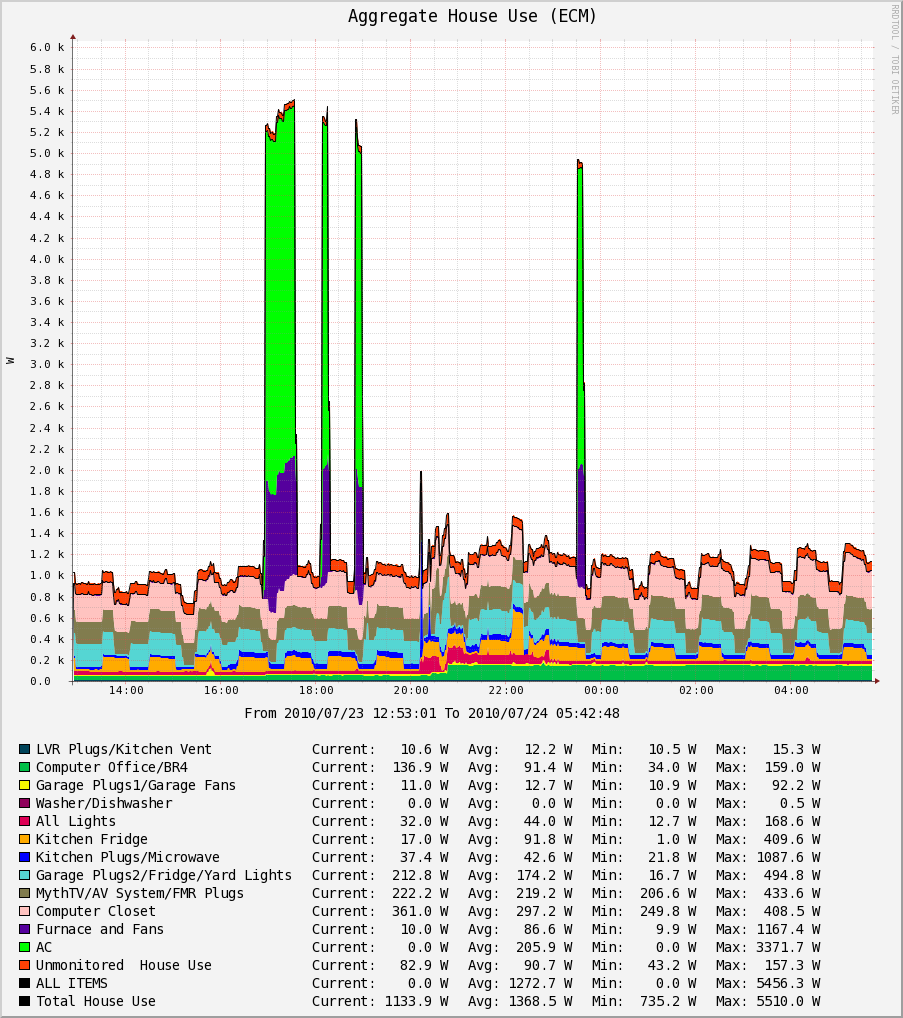
AC run on a warm day:
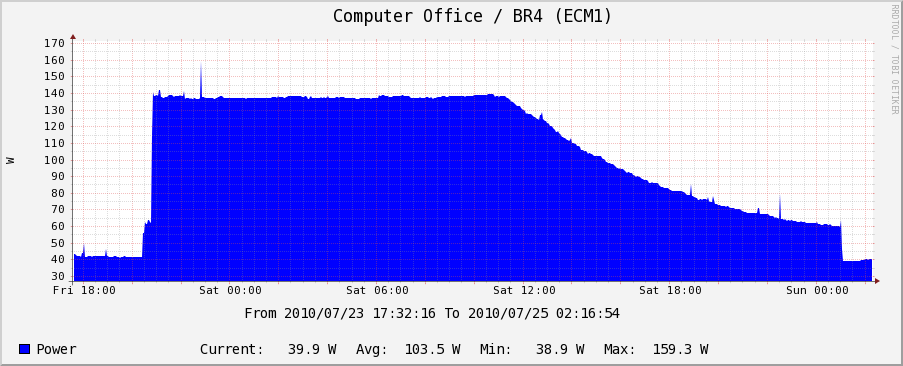
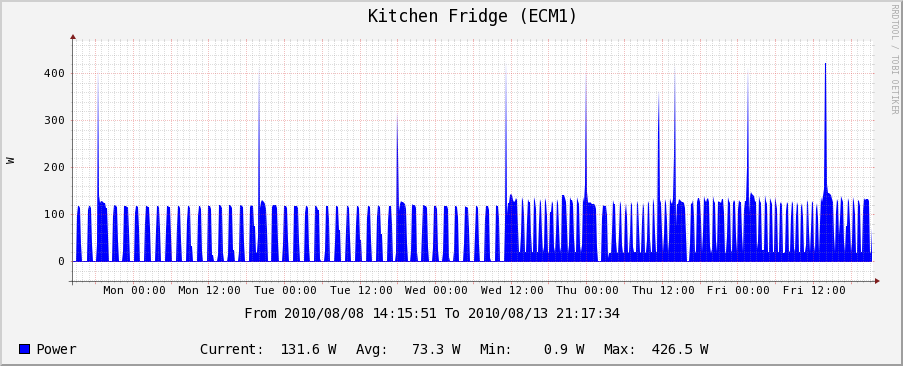
I was curious to know if our old fridge in the garage was having unreasonable and too frequent on/off cycles. The old garage fridge does run a bit warmer but doesn't cycle that much more often than the new one, so I'm not as worried about it dying soon as much (it does take a fair amount of extra power though, being 10 years older):
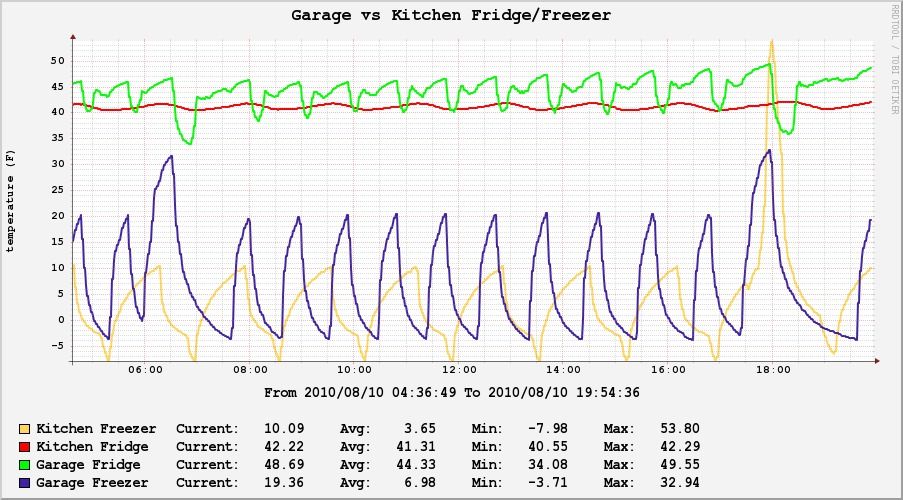
And this lets me keep track of temperature and humidity in our wine closet (the good news is the water plate in the closet does keep humidity higher compared to the house humidity level):
So, my plan was to be able to use outside air to cool the house at night during the summer without leaving doors and windows open on one hand, while being able to boost or shutoff air to the master bedroom depending on the time and boost HVAC air to the family room which gets the warmest but is also the hardest to cool since it's at the end of the line.
Boosting air is simply done by adding booster fans to the right ducts, but controlling the fans at the right time is where it gets interesting: I wanted to be able to decide not to turn on the booster fan to the bedroom during the day (waste of air) and not bother with trying to heat/cool the family room at night either since the master bedroom needs the air more than the family room.
The astute reader will note that this is usually done with dampers, but the furnace we have is older and would require a pressure return for extra air if only one room were targetted, and dampers just add more money and complexity when I already wanted booster fans. The trick is that booster fans can act as semi dampers when they're not running, which is good enough.
Now, the main goal was however to be able to pull air from the outside and bring it in the house. This was accomplished with the same 2 booster fans to create suction this time and 2 dampers do redirect the air from the furnace output to ducts that go outside the house.
damper opened (notice the 2 small wires which got to my 1-wire 8 channel IO board)
So, to cool down the house (or bring warm day air in during the day in the winter), I need to:
For normal operation, I have 2 HAI RC-80 and RC-90 thermostats, one for the house and one for the master bedroom. Depending on which one triggers, the booster fan to the appropriate zone should activate too.
Do you have a zone board that can do all this?
If so, how many hundred dollars is it and do you need to call an HVAC person with proprietary software to reprogram it?
Do the inside and outside temperature probes cost $3 each, or more? :)
If you want to skip ahead, this is the misterhouse hvac code I was able to write to control the hvac system.
This is where misterhouse comes in again, I can program absolutely any logic I want and mostly with sensors and actuators that cost a lot less than typical overpriced HVAC parts.
The bits that came in play were:
Here's a picture of the 1-wire 8 Channel IO board
I then added some 1-wire temp sensors inside the ducts to confirm the temperature of the air going through them, and that's it. All that was left was some code, which you can find below.
When both duct fans are running, the power graph shows they use 300W:
Here is a temperature graph of cooling with outside air without using the AC showing a 5 degree decrease for dining room/family room:
and for comparison cooling with just the windows open, which I don't quite want to do anyway (compare the family and diving room temps which only go down by 2 and 1 degree).
For yet another comparison, the following link is a test with only the family room duct fan running (and not the bedroom one): that was a 3 and 1 degree decrease for the dining room/family room. Not as impressive.
Yes, booster fans do require some electricity to run (150W a piece or so), but for comparison, AC is 3000W just for the AC, to which you have to add 1000W for for furnace whole house fan and then the 150W for the booster fan:
At least, as a bonus, we do now get more cold air to the family room with the booster fan when we do run the AC, so we reach our target temperature more quickly.
Top/Hvac Damper Open to Close Video (click me)
Here is my misterhouse hvac script that controls the booster fans and outside air intake depending on inside, outside temperature and HAI thermostat status.
One would think that hdparm -S 254 /dev/device or something close would take care of it like it would on any laptop hard drive that supports head parking, but no.
Western Digital: what's up with this? Why does your firmware have to be so different and auto head parking after 6 (or is it 8?) seconds not be turned off?
Now, there is an unsupported and technically "void your warranty" solution (which is ironic considering that not doing anything will kill the drives and cause warranty returns within about 1 to 2 years for me): wdidle3 from their site and also wdspinup .
Now, the other problem is that those are green drives and they were taking more power than my other drives because I could not spin them down (I don't use my drives more than a few times a day in a machine where they are on all the time).
The sad thing is that my solution to this was to write a quick program that checks whether the drive has been used recently (using iostat) and manually spin it down with hdparm -y if it has not.
You can get swdisksusp.
I met the buyers today (and old retired couple downsizing from Palo Alto and getting cash out) to help them setup the phone lines via the patch panel and their DSL modem (I have DSL freqs split outside and sent in the wiring closet on a special plug, something they'd not have figured out themselves). I also gave them a primer on X10 lighting and programming, and it was a bit more tech than they were used to, but they were happy.
I know I could have kept it as an investment, but that was just more hassle than I was willing to deal with. I have enough other things that can take my time already :)